
Motivation:
Getting into drums is a tricky affair…
- To play them requires sticks, hearing protection, and (usually) something to play along TO.
- The drums themselves are large, loud, and complicated. And that’s just getting them in the room.
- all that hitting and sweating leads to broken sticks to replace, grimy cymbals to polish, and replacing whatever thing fails next…drum heads, cymbals, brackets, nuts, boots, springs, rims, felt-spacers, rubber rubber parts.
I find that these factors can be more frustrating barriers to entry and growth than the drum kit itself, for student and/or parent.
So, I decided to outline (and justify) the things a drum student should consider …and order it by Phases of Growth …so you should NOT worry about buying all this at once.
PHASE 1: start fit and safe
While private drum studios such as myself do provide the drum kit(s) to learn and rock on, we encourage each student to obtain and bring key study/safety materials to each lesson.
Here is an outline/description/shopping-list of those accessory things. Follow the hyper-links for reference and/or shopping leads. We encourage you to shop around at your choice of music store or online market, where you might find a better price than direct from the maker.
Drum Sticks !
So many sizes, colors and types. Most of them have a number, like 2, 5, or 7…Indicating thickness. Larger numbers are thinner sticks. Usually the letter indicates the taper or “weight” of the stick, but not all brands follow the same naming-conventions.

Don’t worry…here’s some options for different size hands among popular brands I support (for reasons of sustainability and more).
| Make | Child (5-10) | Teen or (Small-hand) Adult | Large-handed Adult |
| Pro Mark…plants 5 trees for every 1 they use. | “Junior”, TX-JR-w | Hickory 5A forward | Hickory 2B |
| Vic Firth / Ziljian …uses sustainable wood sources | KidSticks, in blue or pink | American Heritage 5A | American Classic 2B Rock |
“Drummers Headphones”
Why ?
I tell every student:
Whether practicing, performing, or just messing around
always practice ‘safe sound‘ !
The longer and louder you play without hearing protection, the faster you WILL lose your hearing. I know because I speak from experience: I happen to have many hearing test as a child, yet through much of high school without wearing any hearing protection, and a chronology of tests showed a clear decline in my hearing acuity during high school. In college, I got wise, wore earplugs, and have stopped that Noise Induced Hearing Loss (NIHL) from progressing further.
What ?
“Drummer’s headphones” are used to let the student both protect their hearing form the noise of the drums while clearly hearing the music they’re studying. “Drummers Headphones” are over-ear hearing-protection with foam muffling (such used in construction or runways) with stereo headphones wired inside.

These are not normal headphones, and they are not “active noise-cancelling headphones”. Students should NOT use “normal” (non-muffling) headphones for lessons or out-loud practice. They are bulkier and more rugged than normal headphones. When you put them on, they should substantially muffle the outside world.
- MetroPhones, by Big Bang Distribution

-
- these are what I keep on my main kit at home
- soft (but heavy) gel ear-pads offer SEVERE isolation with more flat frequency response… high end of my playing doesn’t sound so “muffled,” just quiet.
- detachable headphone plug to avoid cable strain
- optional built-in metronome click-er with adjustable (approximate) tempo and click volume. The click sound actually mixes in your ear through dedicated ports in the ear-cup, rather than blending as audio in the line feed.
- Gel ear-cups can be messy if when they rip, but you can buy replacements.
- Not the best option for putting over glasses frames.
- newer models have Blue Tooth audio connectivity and/or LCD exact-tempo readout
- cost around $150 (and up)
- vaialbe through Big Bang Distribution
- KOSS, model QZ-99

-
- super rugged; my choice for keeping in the backpack.
- Come with built-in stereo volume control
- much more comfortable and unobtrusive for wearing over glasses.
- Cost me around $40
- Available at
- CAD, model DH100

- Vic Firth, model SIH2 (Stereo Isolation Phones )

PHASE 2: Tools for Discipline
As we transition from from “making sound (safely) and “getting our blood moving,” students (hopefully) start to see the inherent systematic nature of musical rhythm.
a practice pad
A drummer should be exercising their “stick muscles” more often than they can just play out loud, especially when starting out.
A small, stiff-yet-quiet surface to practice becomes a fixture of good habits for…
- warming up
- show-and-tell stick work during lessons
- put in more of those 10,000 hours
…all in a manner you can talk over.
In addition to being built to stay still on a table/drum/lap, practice pads can feature two other handy designs.
SCREW MOUNTS: to fit the screw-threads of a standard cymbal stand
LEG STRAP: to secure to your leg for (off-center) practice.

a (portable and/or dedicated) metronome
“Why do I need a metronome ?”
The metronome gets a mixed reputation. One one hand, for a drummer to be called a “human metronome” or have “metronomic time” is a compliment. On the other hand, some people think playing, recording (or even practicing) to a click track is somehow sterile or inhuman.
The fact is this: a drummer that is used to staying consistent with a metronome can easily “loosen” to follow shifts in passion and pace, but I have yet to hear of a drummer who only plays by his own guide being able to “lock in” to follow recordings or other musicians.
The most valuable lesson I’ve learned about metronome is how to use to use them to play any beat I learn form a song outside “that tempo” of that song, to better understand and generalize both the mental and the physical encoding of said rhythm(s).
Okay, but do I really need to buy one ?
While it’s temping to look for metronome apps on your smartphone, I find a dedicated portable is preferable for several reasons.
- they are often louder (in open air and headphones) than cell phone can be
- they have much longer worry-free battery life than your phone
- they are both more rugged and less expensive to include among all that slamming and stuff, where you may not want to hit or drop your precious phone.

For a student, I’d recommend any of the inexpensive beeper-sized “beeper” metronomes, provided they have a headphone out and manual volume control.
I have a MR600 by Matrix, which can act as a metronome or tuning reference. simple dial to adjust tempo/pitch, a switches to choose mode and accent-pattern. The row of lights act sweep like the “needle” on traditional metronomes for additional help at slower tempos. I like this because I can adjust any setting I need, from mode to BPM to headphone volume, with one hand, without needing to look at a screen.
The only thing missing form the MR600 are a Tap Tempo input and and a Start/Stop button… so if I were shopping for a spare to keep in the bag, I’d get the Micro-RhythmWatch, RW30, by Tama. It’s tough, it’s loud, it’s stupid-simple to use, but I’d miss the “visual needle” for training below 60 BPM.

At a certain point in making the decision to formalize my basement into a teaching studio, I decided to get myself “the best metronome with all the bells and whistles.” Ya know… for my students….the DB-90, by Roland / Boss

…and I have a love/hate relationship with it…so I named it “Debbie”.
- I LOVE that it has
- a dedicated “Tap” button to tap in the Tempo (to match songs, etc).
- a mode that counts number words…”one, two, three”…up to “nine.” This is great for teaching students.
- little sliders to mix in subdivisions, from the quarter-beat, to eights, sixteenths, and triplets…
- lots of big-dumb buttons to for direct control (without diving and scrolling through menus) so you don’t have to put your sticks down
- a trigger input to coach if your pad hits fall ahead/behind of beat
- a MIDI input so it can clock to a drum machine
- I HATE that she does not have
- internal-memory battery to remember my Programs across any power down… this serious design flaw means that, even though it has batteries, it wipes it’s memory any time you unplug it from the wall or change the batteries.
- foot-switch remote-control of the “Tap” button…
- …or enough room inside the plastic body to drill and mount a remote jack of my own (I tried some elective surgery, and she’s built too snug to hack).
I remediated most of these problems by stealing the DB-90’s soul and job with my Korg MS1 sampling keyboard/sequencer. That gave me foot-switch tempo control and the ability to create and save arbitrary patterns to rain against… but I’m using a keyboard just for the metronome. Definitely diving into “luxury problems” at this point.
Back to stuff that you the student actually need and care about…
Sheet Music !
Why do I have to write ?
A vital learning to drum (and rock) is read and write rhythms and songs using drum notation… from simple counting exercises beats to transcribing whole songs Students should bring their notebooks to EVERY lesson to track progress.
While learning “by ear memory” is often easy and intuitive, I cannot stress enough how important it is for students to incorporate (admittedly more tedious) drum notation work an literacy into their practice.
Working with drum notation affords:
- recording and keeping some understanding of exactly how something could/should be played
- a way to study a rhythm outside of muscle memory, from individual strokes, to larger song structure(s).
- a way to recognize familiar patterns and phrasing
- a means to explore variations on known patterns to push your technique into new ways
- a language to invent completely novel (sometimes obtuse) rhythms to challenge our brains and bodies. I plan (hope) to write articles and/or applets to share some of my ideas and games for generating novel and random rhythms this way.

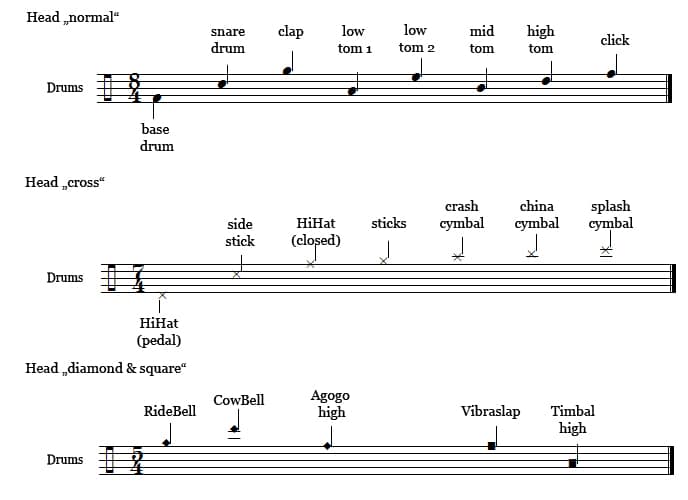
And all rhythm novation is arguably simpler than other instruments: nothing shifts when you change tuning (on a guitar) or a change keys (on a piano). It’s pretty much “one-to-one”, with certain lines or symbols/shapes helping us identify different voices or types (i.e. using “X”s for cymbals).
The only haggle is that, since there is only a loose idea of a “standard kit” of assorted voices, the ledger is not fixed, and open to interpretation.

Ok, ok, who should buy what paper ?
For kids ( 5-12) I recommend wide-ruled paper
- Loose pages of HUGE staff lines (ages 8/under), when writing skills and line-following are rougher.
OR
- Bound book of large staffs (ages 8-12), when hand-control becomes finer.
For teens to adults, I recommend normal-size staff paper
- Spiral-bound book, to work in order, and keep it all together.
OR
- Loose 3-ring paper, for re-ordering, sectioning, and grouping.
Just get it already. I recommend shopping from Hal Leonard…
PHASE 3 – become “field ready”
Eventually, a student starts to identify as “a drummer” and feel satisfaction in having their “drum gear” both integrated and at ready.
We move from “essential” into “helpful.”
A drum-accessory bag
I recommend all drummers pick (and personalize) a backpack or other tote for JUST their drum stuff, and not mix school books or work paraphernalia.It becomes useful to have carry…

all the KEY Elements from the above phases:
- sticks
- drummer headphones
- (portable) metronome
- drum notation book(s)
- practice pad
…as well as all the ACCESSORIES that go with those..
- pencils. multiple pencils. And your own sharpener.
- pen/marker/etc… because you’ll also be writing on napkins and skin
- headphone adapter(s), to convert between the standard 1/8” and 1/4″ audio connectors of your phone
…plus a handful of stuff that we only realize we need when once we start playing out on other people’s kits…
- WATER !
- high-calorie snack
- small towel
- flashlight
- tape
- Band Aid
- spare socks, shirt, or undies (depending on what kind of music you play.
…and the other stuff that we’ve been hearing about drummers use by this phase.
- drum key(s) for tuning heads and adjusting hardware
- books and magazines on drumming (because it’s easier to learn without a screen)
- catalogs to show/tell what’s on our wish-list, now that we’re getting to the gear.

For more info, check out this great article on drum-bag essentials from MusicRadar.com
A Stick Bag

Why ? …two reasons:
FIRST: One pair of sticks is never enough (forever).
Sticks eventually break.

..in fact, one of my favorite things about drums is how (eventually) EVERYTHING breaks…
…SO any serious drummer will need spare sticks. Having an ample supply of your stick of choice in an at-hand bag is beyond practical. If feels official and cool to carry ammunition.
SECOND: one kind of stick is never enough (for all music)
Beyond carrying your stick of choice, it can be good to have brushes, mallets, and other sounds to explore and serve new sounds. It is ALWAYS wise to carry “something gentler” than your default to be able to “take it down a notch” by switching what’s in your hands.
Your tools become your vocabulary, and your vocabulary becomes your music.
What to look for in a stick bag ?
All stick bags have some pocket-divisions, to allow you to ground and sort by application, new/used, etc.. This ALWAYS feels better than digging around loose sticks in a sack.
Many have accessory pouches for drum keys, spare parts, or your phone dedicated hardware metronome
Most soft stick bags have hooked straps that allow you to hang your stick-back on a floor-tom (or similar panel) to be ready for grabbing.

Other stick carries have a means to stand up and act as a stick-display free-standing holder.

Phase 4: become a “geek” and/or “jock”
Ok. We’re definitely moving from “heplful” into “awesome” (…or “luxury”).
The following items have only seeped into my drum room after 25 years of playing (now that I owned my own house). Most of these I wish I’d had on my radar and wish-list after I was committed enough to budget to replace my own first drum kit.
Precision tension-ing tools
You keep beating on something, eventually the noise is going to turn ugly. Drums are more fun and inspiring to play when the tone sound “fresh.”
I think it’s tricky to use the term “drum tuning,” because we don’t (necessarily) tension the skins to match a key or scale, but to shape the balance and character of how it resonates. Drums project more fully and consistently when tension is even across a head, and the relative tension between top and bottom head can shape the resonant arc of decay.
Learning to “tune” is a right of passage for any student, and should be encouraged like hygiene. Learning to tune with a hand-key and ears is the “ground truth” for keeping in tough with our tone, but having some technology can always speed this up in a pinch.
My three favorite drum tuning power tools (that I wish I had years earlier) are:
torque-sensitve drum-key.
When you tune use a drum key to turn one of the tension-rods around the rim, you feel resistance change in your hand. To try to balance the tension by turning the round of rods to an even feel is intuitive, but hard to be precise.
I first saw torque-keys advertised in early 90s, promising “set-and-forget” ease for getting matching tension across the rods. I bought my first one in 2004, and had six within the year…. not for some breaking or collectors problem, but for my one frustration with how they work.

A “torque drum key” like those by Evans or RhythmTech have a slipping mechanic between the handle and the bit, held in place by a ball and sprint. Tension is adjustable, and at a certain (arbitrary number) of tension, the handle will slip out as you pass the resistance that tension holds on the ball. Just turn until it clicks, reset, and repeat for all rods, and your head gets pretty close to balanced with less.
I only have 5 or so of these for two reasons. I left them on a public wish-list, and got 3 in one holiday. As I used them, I found that the same numerical setting on different units would slip at different tension on the same drum.
So… “precise,” yes… but “accurate?”…No.
So, I set and forget one for my snare, one for toms, and one for kick to I can re-tension my whole drum-kit every time I load home from a show.
Spoiled? Yes !

portable torque-limiting cordless driver with drum-key hex-bit
When you have a drum-key chuck that fits into standard hex-tooling of a (cordless) hand electric screwdriver, the tedium of turning a drum key by hand evaporates. I recommend you NEVER use any rotary driver classified as a “drill”… stick to screwdrivers, as they’ll be lighter, and gentler (to not accidentally over-do it).
When choosing a driver, make sure to get one with adjustable torque-limit, so that the motor will slip when it encounters a certain resistance, and make sure this you can stop the lower setting with your hand. Find a torque-limit setting that goes just past how much you can tension the rods with your finger, and you’ve saved minutes of head-changing time with a crude torque-based power-tuner.
I keep and use a Hitachi I got at Lowes.

a drum-head tension gauge.
Instead of measuring tension for the resistant of the individual screw, products like The Drum Dial and or Tama’s TensionWatch measure elastic deformation (tension) at a specific point on the head. Moving around the drum with one of these products can have an almost magical effect to balance and focus the drum where it sits, and tuning or down from there involves much less guess-work.

When I finally bought the Drum Dial system, I got it in the plastic carry case, which allows me to carry an additional hand key, and some silicon lubricant to keep tension-rods moving smoothly and evenly.

Drum-mounted cup-holder
We put cup holders in cars, treadmills, and office desks… to stay hydrated to maintain focused and put the work in. I just feels easier to rack up the hours when you strap in and diminish the distractions of getting up to sip.
I actually spent a week window-shopping cup-holders to that could keep my steel-cups OR tea mugs off the floor. I chose the QuickLok brand clamp-on beverage holder (model MS-326), for ten bucks. I have 2 (one for me, one for student kit), and I’m trying find a place for a third.

Muscle for muscle’s sake: Wrist and Ankle weights
Wanna develop strength and endurance faster ? ESPCIALLY in your weak hand and weak foot. Lift weights WHILE DRUMMING.
I first heard of drumming with ankle-weights from a Modern Drummer article with some drummer named Gene Hoglan (then moving from Death to Strapping Young Lad), and laughed off this “athletic” approach as ridiculous overkill
Then, almost 15 years later, I finally heard Gene Hoglan’s drumming. If you aren’t familiar with his talent and attitude, I encourage you to check him out.
Not only does Hoglan show impressive speed and endurance, but finesse and consistentcy. No wonder they call him “The Atomic Clock.”
Those ARE some STRONG feet.
….I not only kicked myself for not listening to his music earlier, but (since I’d become serious about shredding the double-bass drum pedal) decided to try his method.
I immediately went to my sporting goods store and found the most snug and adjusable wrist-weight and ankle weight set I could find.

The first weekend was brutal, and I realize I was using too much weight, risking injury. I took out about half of the weight-pellets, and found a good balance of added resistance that worked out the right muscles, without making me use entirely new muscles and motions just to support the weights.
Progress and Conclusion:
If you’ve made it this far in The Phases, you’re playing and (hopefully) practicing enough to have learned “the ropes” and the gear…
…congratulations: you’re regularly spending money on “upkeep,” your wish lists are littered with “drummer stuff” that has to be listed by make and model (to the RIGHT thing), and people pepper you with “drummer jokes” and other “tokens.”
If you’ve made it this far in This Article…
….you’re either a fairly advanced drummer with some who enjoys talking gear, or an aspiring student hoping to take the right first- or next-steps to progress their skill.
Either way, I’d be delighted to hear form you.
Leave your questions or comments below !
Leave a Reply